

A simple ComfyUI AI video workflow to copy first
A lot of ComfyUI video posts lose beginners because they start with giant graphs, many custom nodes, or too many quality hacks at once. Wan 2.1 image-to-video is a better first example because the official ComfyUI docs already present it as a native workflow with a clear input image, a prompt, a small model stack, and a direct run loop.[2] That makes it easier to understand what each part does before you add more control.
The core idea
Do not ask ComfyUI to invent the whole film from nothing on day one. Start from one still frame you already like, then use image-to-video to add motion. That is the easiest way to learn how video graphs behave without also fighting scene composition at the same time.
The 6-step workflow
Pick one strong start image first
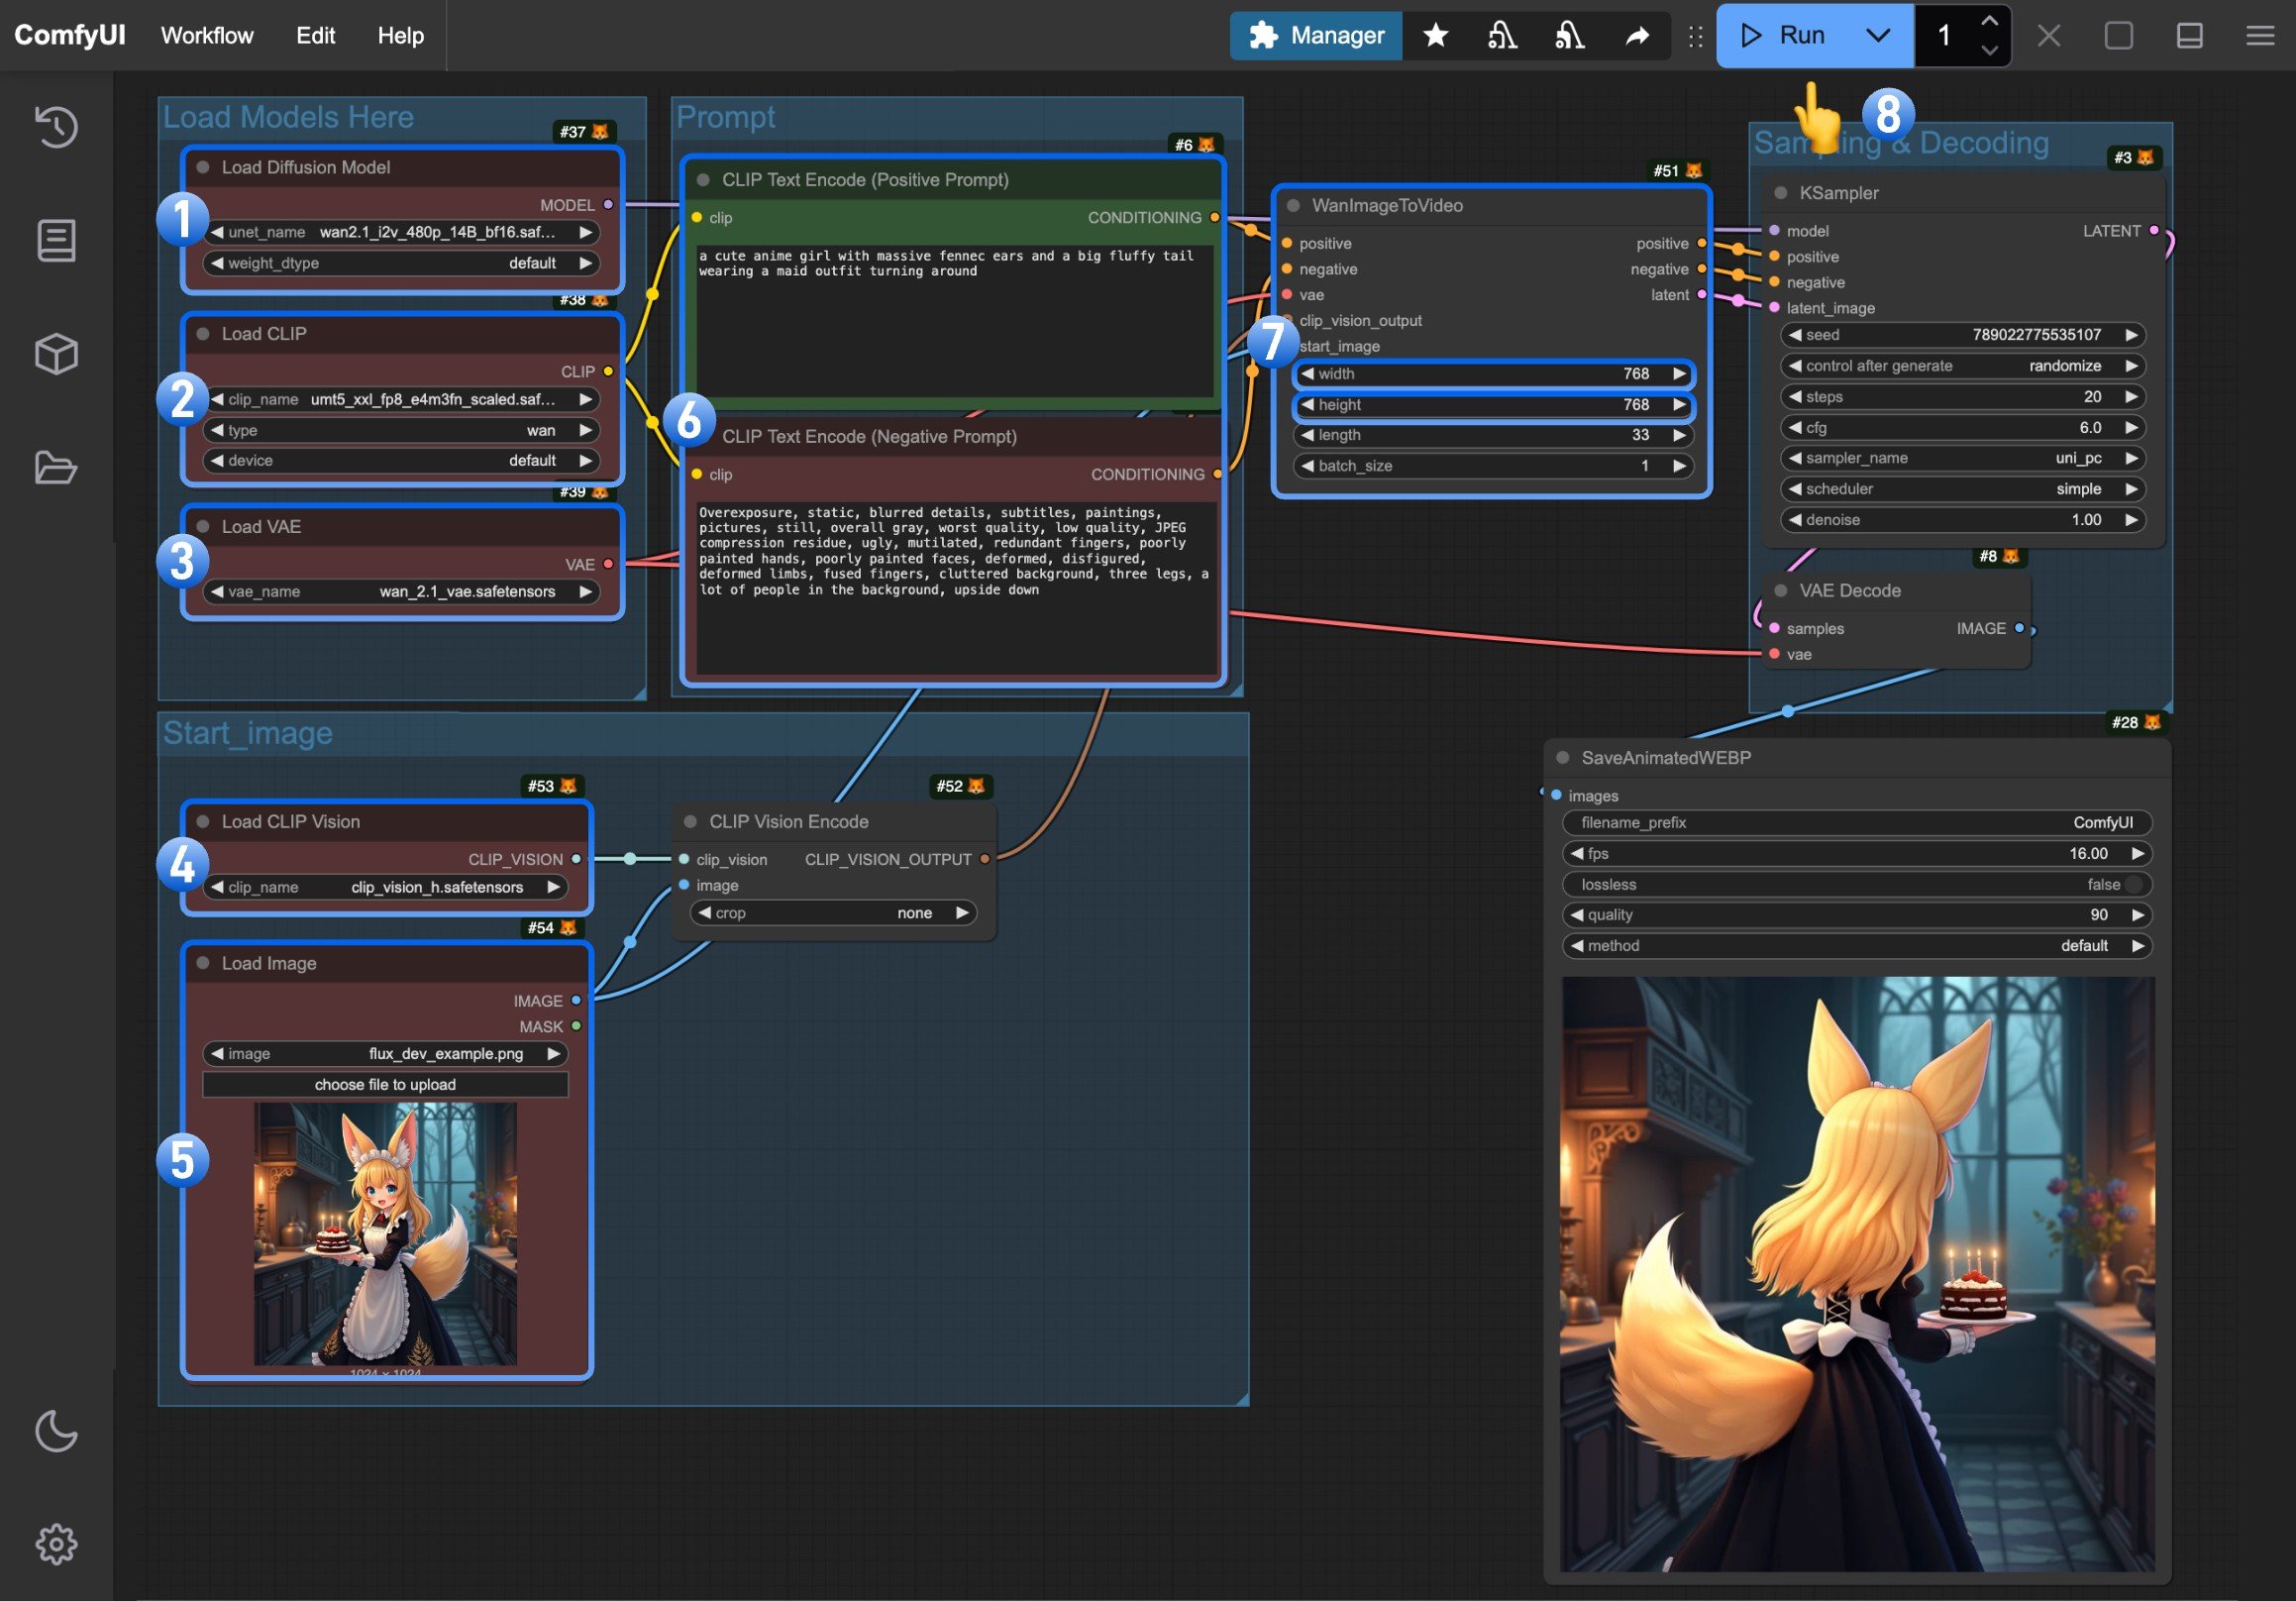
The official workflow begins with a LoadImage node, which tells you something important: this example assumes the shot already exists before motion starts.[2] That is why this is such a good beginner example. You can focus on animation, not on figuring out both composition and motion at the same time.
- Choose a clean still with one clear subject.
- Avoid crowded frames with many tiny moving parts.
- Start with a shot that would already work as a poster frame.

LoadImage node, which is a good reminder that this workflow is image-led first, motion second.[2]Load the four required model pieces
The ComfyUI docs list four required loaders for the Wan 2.1 image-to-video graph: diffusion model, CLIP, VAE, and CLIP Vision.[2] In plain English, that means the workflow needs one model for the generation itself, one text encoder for your prompt, one VAE for image/video latent conversion, and one vision encoder so the graph can understand your input frame.
Load Diffusion Model: Wan 2.1 image-to-video checkpoint.Load CLIP: text understanding for the prompt.Load VAE: latent/image conversion.Load CLIP Vision: visual understanding of the start image.
For the official 480p example, the docs name wan2.1_i2v_480p_14B_fp16.safetensors, umt5_xxl_fp8_e4m3fn_scaled.safetensors, wan_2.1_vae.safetensors, and clip_vision_h.safetensors explicitly.[2]
Start with the 480p workflow before jumping to 720p
The official docs provide both 480p and 720p versions of the same Wan 2.1 image-to-video workflow and note that Wan separates these models by resolution.[2] For a first run, 480p is the better learning path because it lets you validate the graph and prompt logic before you spend more time and memory on higher resolution.
- Run 480p first to confirm the graph works end to end.
- Only switch to 720p after you like the motion behavior.
- Treat 720p as the “cleaner second pass,” not the first experiment.
Write a prompt that describes motion, not just style
The docs treat the prompt inside the CLIP Text Encoder as optional, but in practice it is where you tell the graph what kind of movement should happen.[2] A weak prompt only repeats the image. A better prompt explains the motion: slow push-in, wind through hair, subtle head turn, cloth movement, camera pan, or environmental movement.
- Describe motion verbs, not only the scene look.
- Prefer one clear movement direction over five competing actions.
- Keep the motion matched to the subject and framing you already chose.
The companion YouTube tutorial spends dedicated sections on prompting, camera control, subject focus, prompt troubleshooting, and video length, which is exactly why it pairs well with the official docs.[5]
Adjust dimensions only after the first clean run
The official WanImageToVideo node allows dimension changes if needed.[2] But for a first test, keep the template close to default. New ComfyUI users often break working graphs by changing too many variables at once. First prove the graph runs. Then tune dimensions, framing, or prompt strength one change at a time.
- Do one clean default run first.
- Then change only one thing: prompt, dimensions, or seed behavior.
- Keep a note of what changed so you can repeat good results.
Queue the workflow, review the clip, then iterate upward
The docs end with the most basic instruction—click Run or use Ctrl(cmd)+Enter to execute the generation.[2] That sounds simple, but the real creator lesson is what comes next: review the short clip, decide whether the motion feels believable, then iterate from there. Do not make the graph bigger until the basic motion already works.
Why this example works so well for beginners
ComfyUI can look intimidating because the interface makes every dependency visible. But that is also the advantage. In this Wan 2.1 example, you can literally see the job split: one image comes in, model loaders prepare the graph, one text encoder adds the motion intent, and the Wan video node turns that into a clip.[2]
That is easier to reason about than a tool that hides everything behind one button. Once you understand this graph, the next official directions—text-to-video, first-last-frame, and character-consistency workflows—start feeling like extensions instead of totally different worlds.[1][3][4]
Tool stack, in plain English
Your visual anchor. This is the shot the whole clip grows from.
Diffusion model, CLIP, VAE, and CLIP Vision together form the minimum native stack for this workflow.[2]
Use it to tell the graph how the shot should move, not just what the shot looks like.
Easy mistake to avoid
Do not treat a higher resolution as a better starting point. A clean 480p test teaches you more than a broken 720p run. Get the motion logic right first, then spend more compute on the nicer version.[2]
Sources
Used for the “what to try next” context: ComfyUI has a neighboring official Wan text-to-video path, which helps frame image-to-video as one entry point rather than the whole video story.
Read sourceMain source for the workflow choice, required models, 480p/720p split, input image, optional prompt field, optional dimension edits, and the official run steps.
Read sourceUsed for the “grow from here” recommendation. Once the basic image-to-video graph makes sense, first-last-frame is a natural next upgrade for more controlled shot endpoints.
Read sourceUsed for the advanced-next-step note. It shows that ComfyUI’s official Wan docs also branch into consistency workflows after the simpler entry workflows.
Read sourceSupporting tutorial video: ComfyUI - Wan 2.1 Image to Video, Made Simple. Used for the embedded walkthrough and for the note that the video covers nodes, prompting, camera control, troubleshooting, and video length.
Watch on YouTube